

Summary: This article explains how to repair hard disk not detected in a computer, and best solutions of using Bitwar Data Recovery Software to recover data from Seagate, Samsung, Toshiba external hard drive that doesn’t show up in Windows 7, 8, 10.
One of the most shocking encounters you can have while working with Seagate, Samsung, or Toshiba external hard disk drive failure and it’s not showing up on your computer at all! Especially if you’re working on something urgent and time-sensitive, this sort of problem can be a big bummer.
While you should not take these situations lightly because of the risk they pose on losing your files or even your external drive itself, there is no reason to panic. Each potential risk in situations like these actually has very straightforward and simple solutions. These are simple yet potent fixes that you can do yourself on how to repair hard disk not detected.
There are mainly two concerns that may arise in situations like these: Steps on how to repair hard disk not detected and recover lost files due to hard disk not showing up. You might need to consider many things in this process, but let’s take it one step at a time.
Table of Contents
Steps on How to Repair Hard Disk Not Detected
There can be several reasons why HDD is not detecting by your computer. The problem can be a simple hardware issue, or it could be a problem with the drive and the files itself. Here are some quick-fix solutions for you to determine what kind of problem it is and how to deal with it.
Step 1: Try New USB port
If it works in another port, then the problem can simply be a worn-out USB port on your computer. This is the most desirable case since it is the scenario that poses the least risk to your hard drive and the files in it.
Step 2: Connect to Different Computer
Other causes of that PC won’t recognize external hard drive can be compatibility issues. Some hard drives can be incompatible with certain types of operating systems.
If this is the case, you can simply try plugging your hard disk into another computer, preferably with a different OS (If it can’t be detected on a Mac, try plugging it into a Windows computer or Linux, and vice versa).
If you still can’t see the external hard drive, then you can have this secret weapon:
Step 3: Uninstall the Hard Drive Driver and then Reassign the Drive Letter to the Hard Drive
- Press Win Key + R to and then type Devmgmt.msc to launch the Device Manager.
- Go to Univeral Serial Bus Controller > Choose the device with an unrecognized icon.
- Right-click on it and choose Uninstall.
- If your hard disk shows up as in My computer/This PC, follow steps below to reassign the drive letter to this hard drive.
This is done by simply going File explorer and select “This PC.” 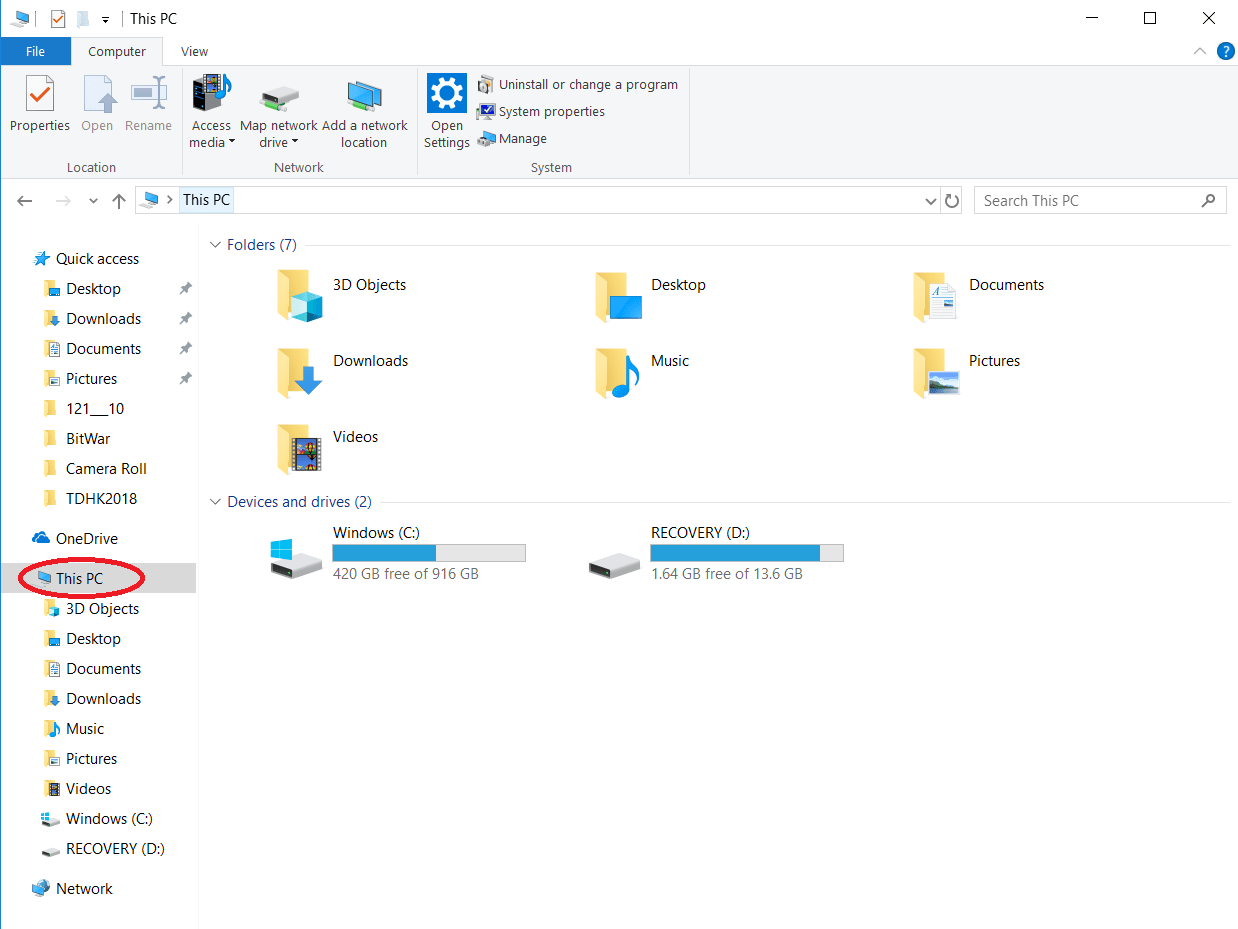
From the options above, select “Map Network Drive.”

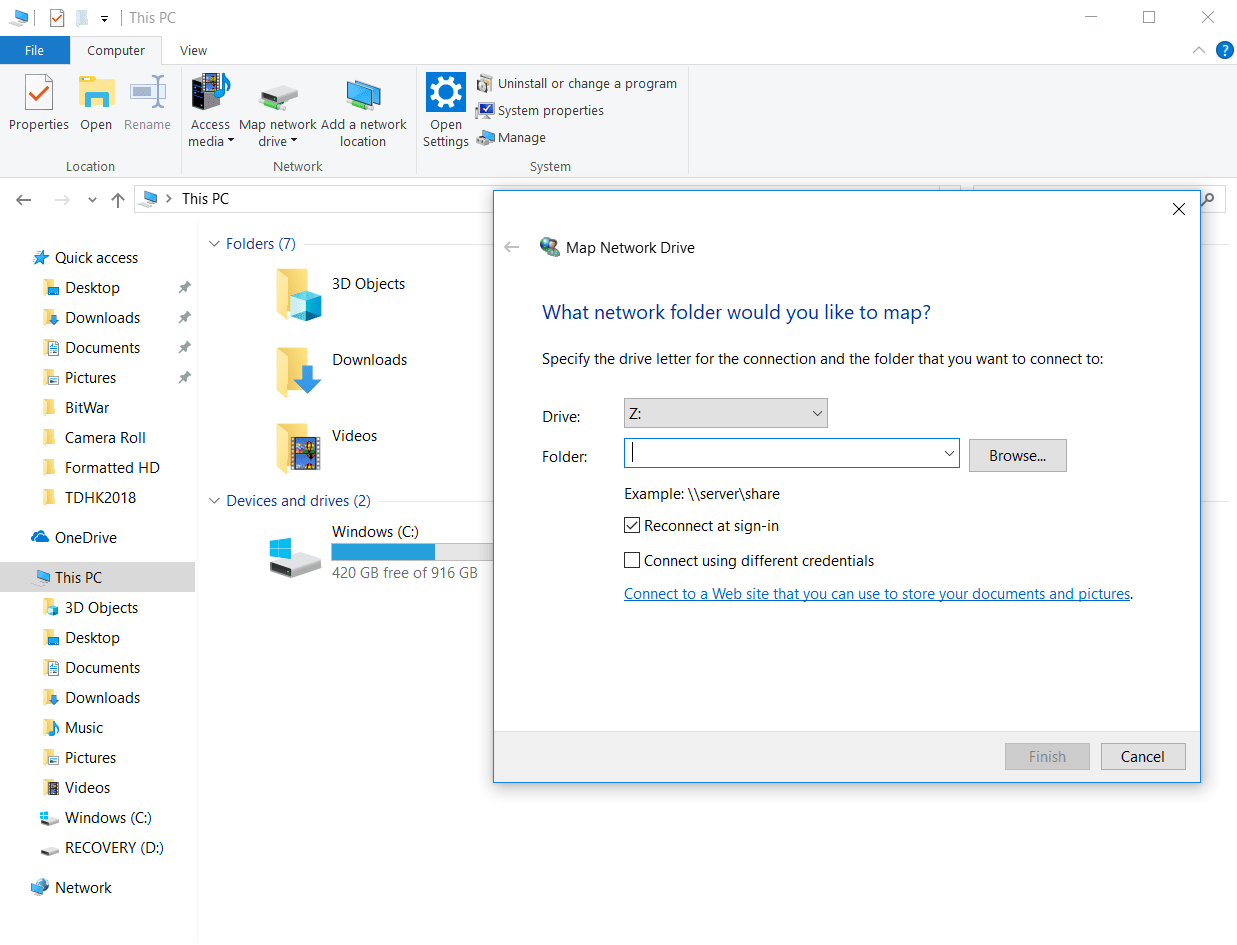
Choose a drive letter that is not in use and finds your drive by clicking “Browse.” After that’s done, you can finish the process, restart your computer, and connect your Seagate external hard drive again.
 Here’s the thing. The lastly mentioned solution should be able to fix your problem and make your hard drive visible again. You might get a prompt saying that you need to format the disk in drive: X before you can use it again.
 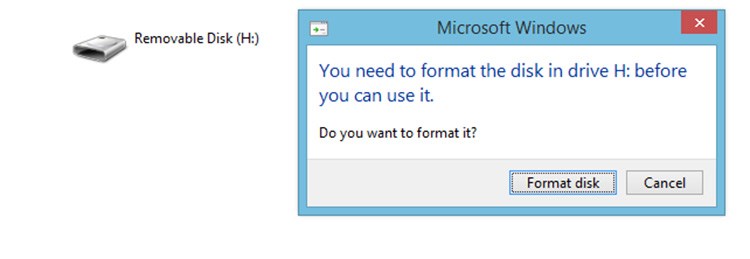 But don’t worry, you don’t really have to do that. Once your hard drive is visible again, you can easily retrieve the files that you need using this software called Bitwar Data Recovery.
If, later on, you would want your hard disk to function like normal, that’s the time you may need to format it. But for now, let’s focus on getting your files back!
How to Restore Lost files after Fixing Hard Disk Not Detected Error
Recovering your files is only possible with certain programs called data recovery software. One of such software that you can use easily and for free is Bitwar Data Recovery. Simply download the software and create a free trial account to start using it.
Once you have installed the program, you can recover your inaccessible files using simple steps:
Step one: Select Partition Or Drive
Since your hard drive is now appearing on your computer, it should appear within the list of partitions and drives listed on this window. Simply click your hard drive and click “Next.”
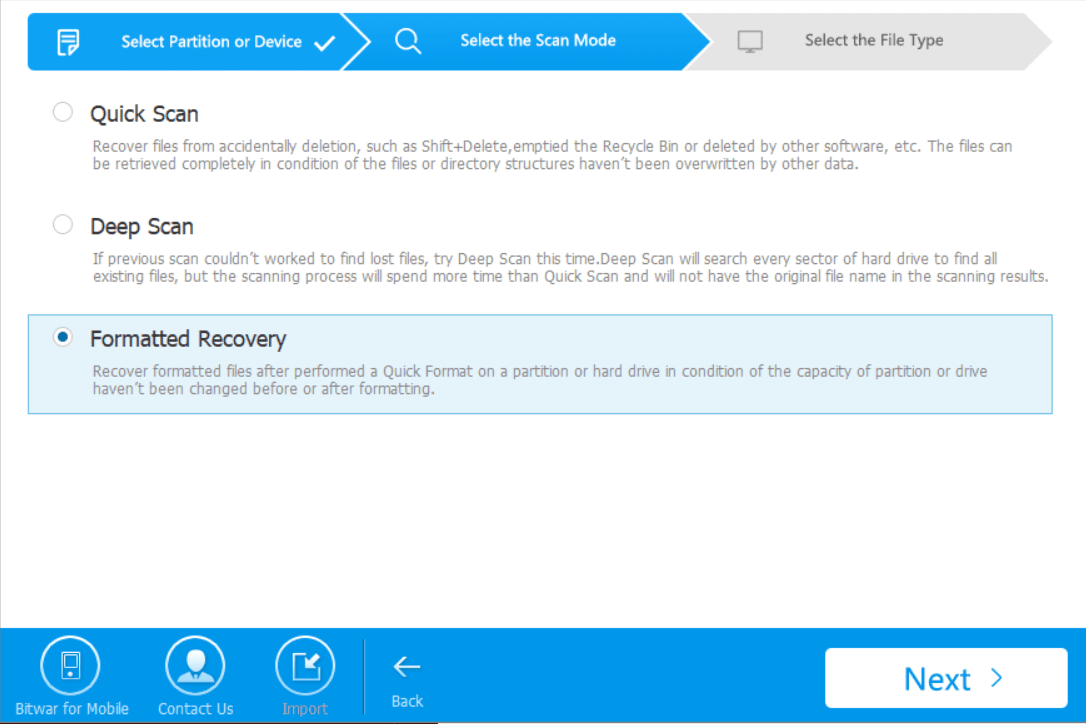
Step Two: Select Scan Mode
Choose Quick Scan for the first time. It yields results in the fastest speed and can recover your files with their original file name and folder structures.
Step Three: Select File Type
This step narrows down the scan results and thereby making it quicker. You can tick only the file types of the data that you urgently need to recover. Or, if you need all of the files in your hard disk, you can simply tick the “Select All Types” option and click “Scan.”
Step Four: Preview and Recover
The scan will take several minutes or more, depending on how many files the program can detect. As you wait, you can choose to preview the files to make sure that they are still functional (especially for images and videos).
One very useful feature of this software is that you can recover files that you urgently need without waiting for the whole scan to finish. As you preview the files, you can click the “Recover” and immediately getting your file back.
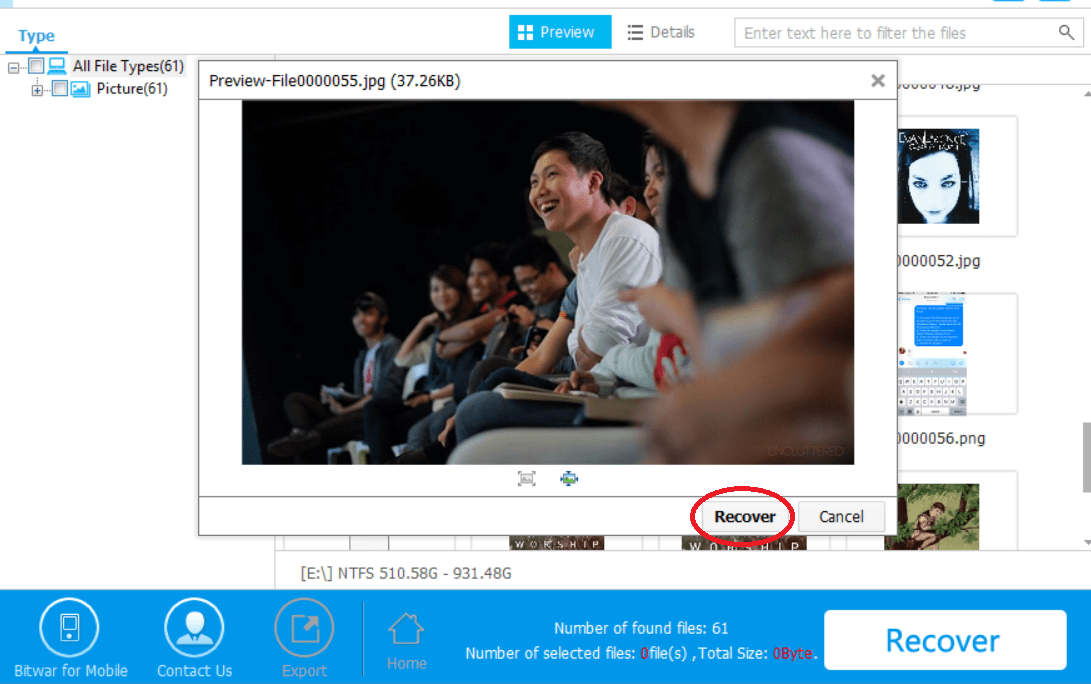
For cases like these, you can simply set the destination folders for your desired files, and voila! You have your files back!
Step Five: Turn to Deep Scan Mode if Necessary
If the Quick Scan doesn’t do the trick, though, you may want to scan your drive for the sectors not reached by the Quick Scan. That’s what the Deep Scan is for. This scan mode has a deeper reach, but it usually takes a long time and the results will be in generic file names.
Steps of Performing Format to Retrieve Hard Disk
After recovering successfully of the data you need, you can then perform format on the hard disk to make it normal for use.
- Press Win+R and then type “Control” in the Run Window
- Enter into Control Panel, and search “Disk Management” in the top-corner search bar
- Find Administrative Tool with a subtitle: Create and format hard disk partitions
- Right-click the target hard disk and choose Format
What Should You Do to if You Have Already Formatted the Hard Disk?
If you have already formatted your hard disk. You can choose Formatted Recovery Mode, From the name itself, this scan mode can detect and recover lost files after formatting. Tick this option and click “Next” and follow the steps to recover.
You may have an interest in reading this article: How to Recover Data from Formatted Hard Drive
[Updated] Other Workable Solutions to Fix the Error without Losing Data
The reason why I put these solutions to repair hard disk not detected by computer at the end of the article that is not to ruin the article construction mentioned-above and the other reason is to make the solutions a Quick-fix type.
WARNING: Blow solutions require extra computer skills, though please check below steps carefully before you decide to perform. If you are not familiar with the operations shown as below, ask for an expert friend or stop following the tutorials.
Step 4: Show Hidden devices from Device Manager
- Press Win Key + X to launch the Shortcut features from Start Menu, for Windows 7 User, you can press Win Key + R and type devmgmt.msc
- After that, hit on the tab View from the menu bar, check “Show Hidden Devices“.
- Then expand all hard drive device lists to find whether there is the device with the light gray icon. Select them and uninstall.
- Restart your computer and check if the problem has been fixed or not.
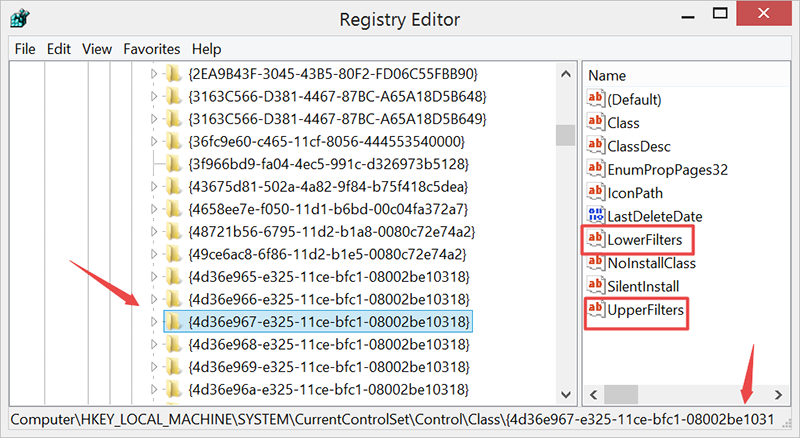
Step 5: Change the Windows Registry to Overcome the Issue
- Press Win Key + R and then type Regedit.exe to launch the Registry Editor.
- Find the path: HKEY_LOCAL_MACHINE\SYSTEM\CurrentControlSet\Control\Class\{4D36E967-E325-11CE-BFC1-08002BE10318}.
- Backup your Registry by choosing File > Export and save the current settings to the Desktop, after that Delete the UpperFilters and LowerFilters entry from the right-side panel.
- Restart your computer and then check whether your hard drive is visible or not.
- If the solution can’t work to help, open the Registry Editor again and choose File > Import to load the backup to restore.
Repair It Now!
Have you tried the quick fix solutions mentioned in this article on how to repair hard disk not detected on your computer? Do you need to recover some files? If yes, then go and install Bitwar Data Recovery NOW! It is one of the best software out there that you can use to recover deleted files for FREE!


Hello guys! Definitely this is something that looks awful at first, but it can be fixed in simple steps as this great guide shows! Wanted to leave my testimony since I got the Bitwar software a few months ago, and it’s been working perfectly since then with different devices!
Thanks for using our data recovery software, Andrea, and that’s very happy to see our article can do to help you. If you need to get further support from us, just send us an email or click on the live chat icon to start the conversion with us. HAVE A NICE DAY!
Worked perfectly for me, great contribution! Fast solution to several issues, love it! Count me in as a long term user :)!
We are happy that you can fix the issues with our Bitwar Data Recovery Software, Robert, have a nice day!
Didn’t knew that something like this could exist, silly me! Such a great solution, thank you very much! I think this guide is pretty simple, I could follow every step with no problem, but I just wanted to say that would be also great to have videos for people with more issues handling computers and such, keep up the hard work, and thank you!
Yes, Jacob, making the tutorial video is also excellent for users to follower easily, we’ve arranged this job in our to-do list, will add the video into the article once we have finished the works, thanks again for your suggestion and wish you a nice day!
Great information, so so helpful! Been looking for something like this for a while, someone told me that the other software’s available weren’t as complete as this, so I just got it and runs very smooth in my computer, I was able to search through all the files and pick what to restore or just have everything back, indeed is a great tool, 100 % recommended.
Thanks for your Review, David, and that’s nice to see you’ve got back all of your lost files with our software, anything you need to ask, we are here to help. Have a nice day.
Really glad I found this, though for a second that the disk was damaged. The deep scan took a while and maybe it wasn’t necessary , but still got a great result. I would suggest only use the deep scan for a device with high volume of files!
Hi, Hylia, the better way to scan your loss of data from the computer is to use the Fast Scan for the first time, it offers original file name, folder structure and original file path that can be filtered faster than Deep Scan to get back the needed files. Generally, the Fast scan takes only several minutes to finish the search, however, if this fast scan mode can’t work to help find the files, Deep Scan is the mode you need to try alternatively, and like as you said, it took a longer time to scan as it needs to search every sector of the hard disk to find more files.
However, we are also having a better solution for users to filter the large amounts of the file in a faster mode, like Extract the first sentence from the document, archive, text to be set as the file name, set the image‘s resolution as the file name and most importantly, you can also turn to the preview tab to let the software generates thumbnails for the scanned data.
Thanks again for your comment, we are happy to be your assistant whenever you need help from us. Have a nice day!
Great! Yeah that’s what I’m going to do the next time! This is definitely something I see myself using a lot, so It’s great that I already know exactly how to use it! Thank you for the reply! Very interesting software, but the best part is having people to help you haha, great support team! congratz!
To be a software developer, the first thing in our mind is to help people who are suffered from data loss issues. Try our best to design the easiest data recovery software with a step-to-step interface so that anyone can use it without any hassles. Though, if you or others are having any troubles of using the software, just leave the questions here or send us the emails, or chatting with us, we are glad to reply soon as we can. If you like our software, just help spread the program to any other people who need your help too. Have a nice day.
So true! Best software to recover deleted/lost files! Already tried a few and trully nothing like this, so useful for so many things! Also 5/5 to this article! loved the explanation! Sadly there is no magic to fix damaged cables hehe!
Thanks for your review, Nina, as if the data lost due to hard disk logical failure, manual deletion or virus attack, Trojan Infection, our data recovery software can work to help you recover data that you need. However, if the hard disk’s cable is damaged, you should be concerned and it’s better to change a new one in order to prevent being lost data again. have a nice day!
So true! The shocking situation I’ve had with computers, I had all my thesis storage in the external hard drive and suddenly it didn’t showed up anymore, just to inform everybody, you can download the Bitwar software and scan, but at the moment of get your files back you need to make the payment, can by annoying for some people, but it saved my life, I think the life time is the best option, hope this information is helpful to someone, bye!
Hi, Jason, thanks for your review, wish you a nice day!
Relatable to all that! Many things can become an obstacle with our devices! I’m glad you guys help a lot with the software are even over here wih the comments <3 happy to be in this community!
Thanks for your comment, Alexandra, have a nice day!
Just 5 steps?! wow! Great guide, so simple! Will start doing it right now, I was almost about to give up on that external hard disk, so happy to think that I will get my files back, sounds really silly but all the things that we storage are really important sometimes!
I agree with you, Alexandra, we’ve had face kinds of situations that people lost their files accidentally, e.g, delete the vital data along with the unwanted files, emptied the recycle bin without the attention that the documents, photos they need also stay in the Recycle Bin, and the hard disk not detected by computer is also one of the most concerned cases that users cannot access the hard disk to get the jobs done. That’s why we think it’s better to write such steps for the users who are facing the inaccessible hard drive issue and can fix the error easily without obstacles. Have a nice day!
Comments are closed.