

Summary: Follow the article below for some of the best ways to fix “Windows Was Unable To Repair the Drive” error with the Free Data Recovery Software – Bitwar Data Recovery Software.
Many errors can happen in a Windows 7, 8, or 10 system such as Windows cannot repair the external hard drive, sd card, or memory card. For example, the most common errors is the “Windows was unable to repair the drive” error. Don’t worry as we will show you all the best fixes or solutions below to solve this error!
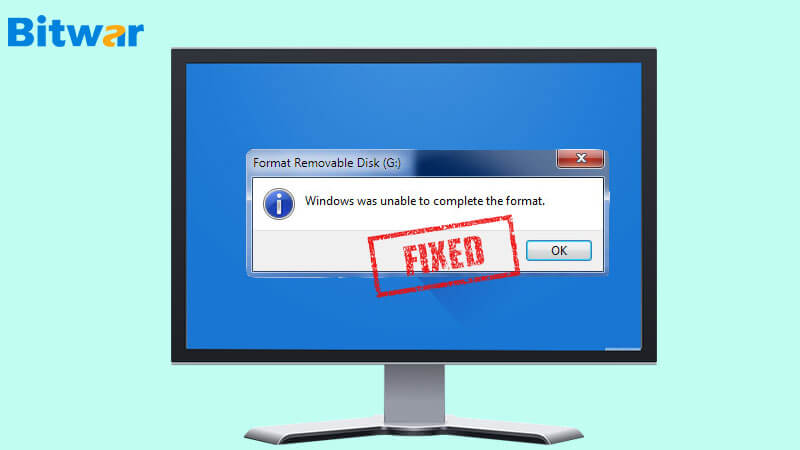
Table of Contents
Common Factors
Before we continue with the solutions, it is best to understand the factors or reasons that can cause the error on Windows. Refer below:
- Unsafe ejection/removal of the hard drive.
- Viruses and Malware.
- Corrupted file system.
- Drive being used in many other devices such as laptops, cameras, and gaming consoles.
Solutions to Fixing “Windows Was Unable to Repair the Drive” Error on Windows
As for the solutions to fixing the error, we have broken down the answers into two parts, which are unsafe and safe solutions. Whether a solution written below is safe largely depends on its possibility of data loss. so it is up to the users to follow on which solution is better to fix the “Windows was unable to repair the drive” error.
Part 1: Unsafe Solution
Solution 1: Windows Scan
Windows users always encounter an error message saying that “There is an error with the drive which you are using, you need to scan and fix it.” Following the error message, users need to perform the Windows scan process to fix the issue.
After the scan, there are two possibilities:
- There is no error found in the scan process.
- If any error happens, Windows will suggest you fix the error in error checking window, where you can follow a simple procedure to repair the erroneous drive quickly.
Nevertheless, what if Windows is unable to repair the drive? In this case, at the onset, you will have to recover all your relevant data since when you apply possible solutions to fix the “Windows was unable to repair the drive” issue, there are fair chances of data getting lost.
Solutions 2: Recover Data with Data Recovery Tool
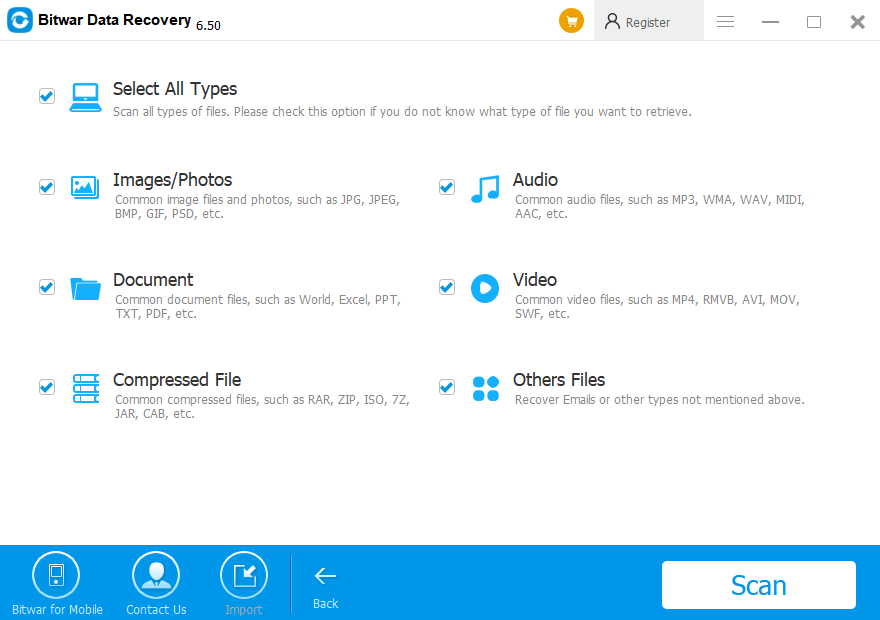
Bitwar Data Recovery Software serves as a powerful tool for getting back any data such as audio files, docs, videos, images, etc., from any external storage device such as hard disk, SD card, and USB flash drive. The software has a user-friendly interface that recovers data in a couple of easy and simple steps.
Besides, the software is also compatible with both Windows and Mac operating systems. Let us go through the data recovery steps using the high-quality recovery tool Bitwar Data Recovery Software, which provides a complete recovery solution.
Follow the guided tutorial below to retrieve data from “Windows was unable to repair the drive” issue:
Step 1. Download and Install the Bitwar Data Recovery Software according to the system.
Step 2. Launch the recovery software. Click on Standard mode and select Lost Partition Recovery followed by clicking on Next.
Step 3. Choose the Lost Partition and click on the Next button.
Step 4. In case unable to locate the lost partition, click on Deep Scan mode to search for more partitions. Then, select the Lost Partition and press Next.
Step 5. Select the File Types and click on Next.
Step 6. Preview all the selected data and click on Recover to start the data recovery.
TAKE NOTE: After successful completion of data recovery, store all the recovered data at a SAFE location and DO NOT store it back on the same partition or drive where you lost it from!
Solutions 3: Restart Computer to Clean Boot
Sometimes, programs that are not installed appropriately on the system can trigger the “Windows was unable to repair the drive” error, especially when connecting the external drive or running the CHKDSK utility on the network.
Therefore restarting the computer to Clean Boot can help to identify the issue as by following the steps below to start the Clean Boot:
Step 1. Go to Start search and type msconfig to open the System Configuration utility.
Step 2. From the General tab and click Selective startup.
Step 3. Clear the Load Startup items checks box and please check the Load System Services and Use Original boot configuration options.

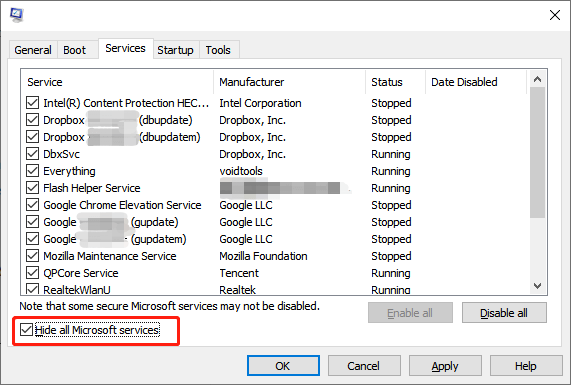
Step 4. From the Services tab and click the Hide All Microsoft Services box. Then, select Disable all.
Step 5. After finishing all the settings, click on Apply or OK. Lastly, Restart the system.
The system will restart into the Clean Boot State and choose Undo the changes to set the Windows for using the usual startup.
Once the computer has restarted in a Clean Boot State, check whether the scan is working or not by performing the scan again. After that, start checking which program is not working well that is causing the issue to happen on the system.
Part 2: Safe Solutions
Solution 1: Command Prompt
Step 1. Go to the Search menu and search for Command Prompt.
Step 2. Right-click and Run the system as Administrator.
Step 3. In the window type the command E: where E is the drive letter. Then, press Enter to execute.
Step 4. Type another command chkdsk /f /r and press Enter to execute the command.
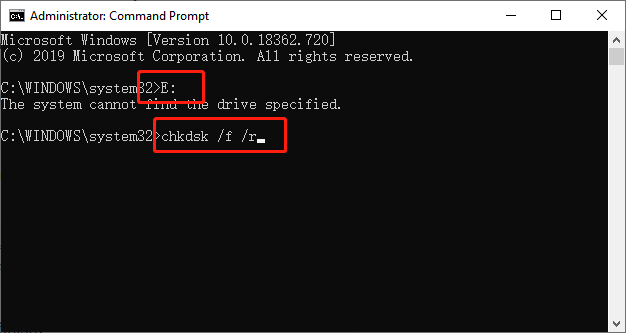
Here, /r helps in finding the bad sectors and recover data wherever possible and /f works to force the drive/disk to unmount before the starting of the scan process.
Step 5. Please wait for some time for the process to finish.
Solution 2: System File Checker Tool.
Suppose that the Command Prompt solution above is not able to fix the “Windows was unable to repair the drive” issue. Then, try to perform the system file checker tool in the command prompt window:
Step 1. Launch the Command Prompt by choosing the Run as Administrator option again.
Step 2. In the window, type sfc /scannow command and hit Enter to execute it.

Step 3. Please wait awhile for the scan process to complete and then Exit out of the Command Prompt.
Step 4. Restart the PC and preview whether the issue is fixed or not.
Solution 3: Hardware and Devices troubleshooter
Try to use the Hardware and Device troubleshooter to troubleshoot the particular error and repair the device as below:
Step 1. Click on the Search menu and look for Control Panel.
Step 2. Select the option View by Small Icons and then select the Troubleshooting option from the list of items.
Step 3. After that, search for Hardware and Sound from the right side of the panel and click on Configure a device option from here.
Step 4. Select the Advanced option from the pop-up window to apply repairs automatically.
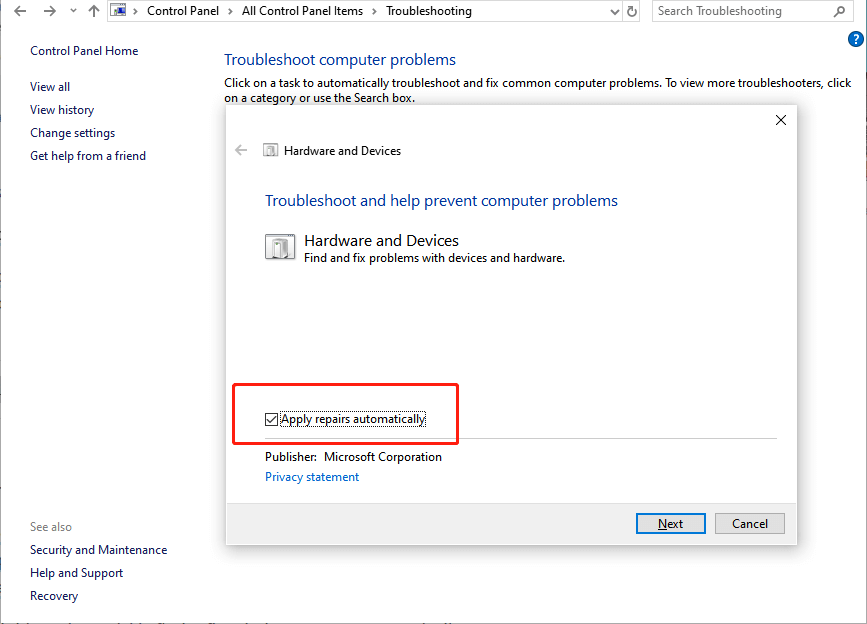
Step 5. Finally, click the Next button and follow the instructions as given to complete the repairing procedure.
Suppose that you lost any data when you are trying to fix the issue on the system. Always remember to backup or recover the lost data from the hard drive by following the recovery steps with the recovery tool provided above.
Fix-It Now!
Although there are many types of solutions to repair and fix the “Windows was unable to repair the drive” issue, there could be high chances of data loss while applying some of the solutions. Thus, data recovery is essential to prevent any permanent data loss.
We recommend making a backup or data recovery with the help of the professional and reliable Bitwar Data Recovery Software, which is one of the most trusted brands by Windows users!
Read More
1. Full Guide of Fixing “Seagate External Hard Drive Not Responding.”
2. 7 Best Solutions to Fix “External Hard Drive Takes Forever to Load” Issue.
3. Fixed: Seagate external hard disk light blinking but not detecting.
4. 5 Effective Methods to Resolve the “Internal Hard Drive Recognized as Removable” Issue on Windows 10.
5. 4 Ways to Fix “The disk structure is corrupted and unreadable.”


