

Summary: Here are the 6 best solutions to overcome “The operation could not be completed because the volume is dirty” error, and the best data recovery software – Bitwar Data Recovery Software to recover essential data.
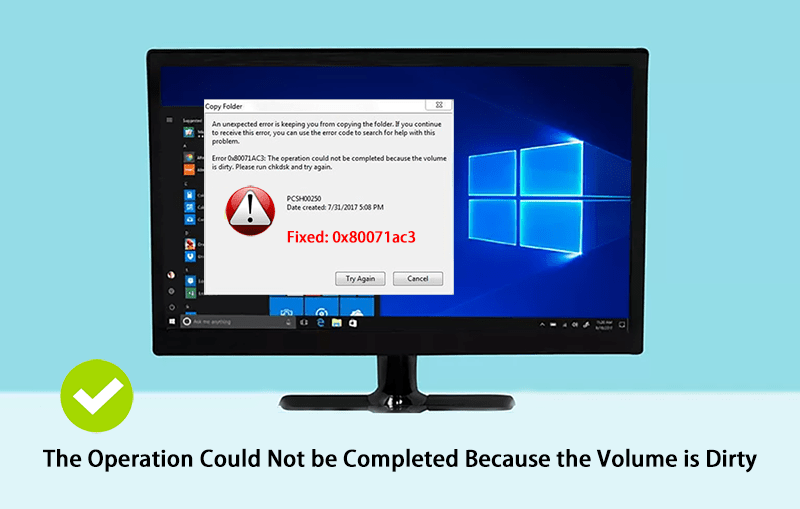
“Yesterday, I was about to transfer a few of my files from my hard drive, e.g., C partition to my external hard drive, but I was interrupted with an error message. As soon I pasted those files on my external hard drive, the procedure failed and showed the error message “the operation could not be completed because the volume is dirty“. I tried to do the same again after deleting the files, but the result was the same.“
Don’t Miss: 7 Solutions to Fix Please Insert a Disk into USB Drive
If the Windows is showing, error code: 0x80071ac3, the volume is dirty; basically, it Windows is unable to read or write the data on the external hard drives, SD memory cards, or USB drives.
Although the operation could not be completed because the volume is dirty is a prevalent issue, but it is very problematic and can interrupt your work. So follow the effective solutions below to fix the problem!
Table of Contents
How to Fix the Volume is Dirty on Windows 10, 8, 7
Solution 1: Inspect the Drive
If you are getting the operation could not be completed because the volume is a dirty error, every time you try to copy a file, you must inspect the drive first. You have to execute the procedure via Command Prompt.
The steps are straightforward; let’s have a look here:
Step 1. So, open your computer and make a Right-click on the drive that is causing the issue. Go to Properties.
Step 2. Now, open the Tools tab and then click on Check or Check Now.
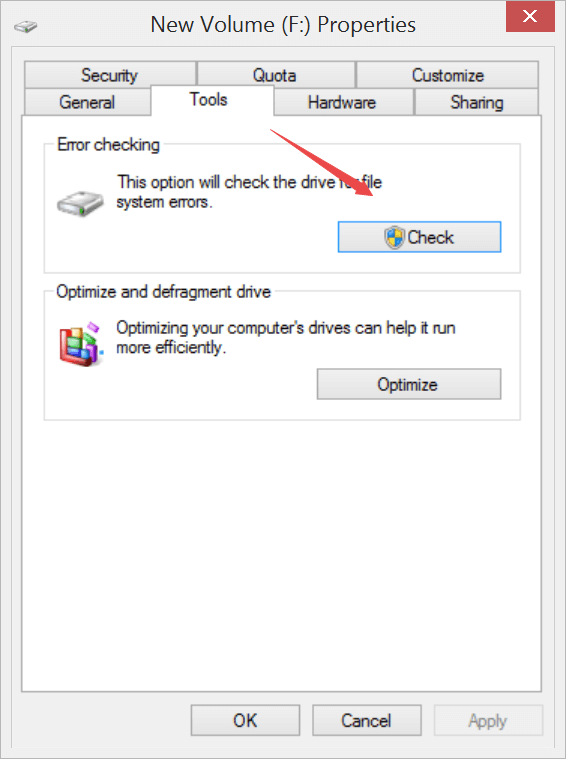
Step 3. If you are a Windows 10 user, then you will click on Scan and Repair Drive, but if you are Windows 7 user, you need to check all the options and click Start.
Now, you need to wait for the scan to get completed. The progression will be visible, but after that, the drive-in question will get fixed automatically.
Solution 2: Registry Changes
Sometimes, Windows is not allowing you to copy files due to lousy registry configurations. So, you must try to resolve them in the right order.
But before you do that, you must know that; changes in registry can cause serious issues with your OS; so, make sure that you are following the steps very carefully.
Step 1. Open your PC and press Windows + R keys, type Regedit and hit Enter to execute and lastly, click Yes.
Step 2. After the registry opens, you must go to HKEY_LOCAL_MACHINE and then click on System.
Step 3. Go to CurrentControlSet and then click on Control.
Step 4. Find StorageDevicePolicies and click on it.
Step 5. Inside it, you need to open WriteProtect and double-click on it.
Step 6. After that, you need to change the write-protect value from 1 to a complete 0, click OK to make changes.
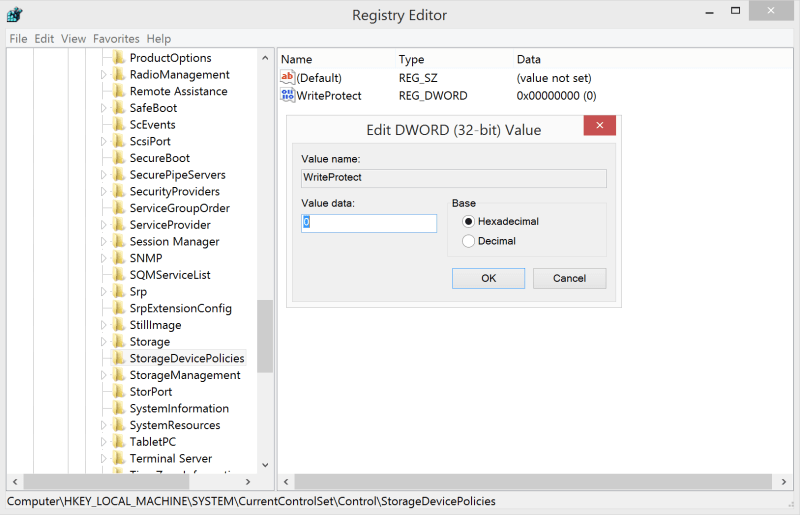
After this, just close the Registry Editor and Reboot your PC. After your computer starts again, you need to check if you were able to get rid of the issue.
Solution 3: Disable Readyboost
Since Microsoft brought us a disk caching software component called Readyboost, which enables write cache between storage drive and RAM to enhance the computing performance on Windows Vista or later operating system, but USB drive is slower than RAM, then enabled Readyboost feature may lead to the volume is dirty issue.
We should try to disable Readyboost to eliminate it as below:
Step 1. Connect the external device to the computer and then enter into My computer/This PC.
Step 2. Right-click on the external device, select Properties.
Step 3. Turn to Readyboost tab and tick on Do not use this device, Apply the change.
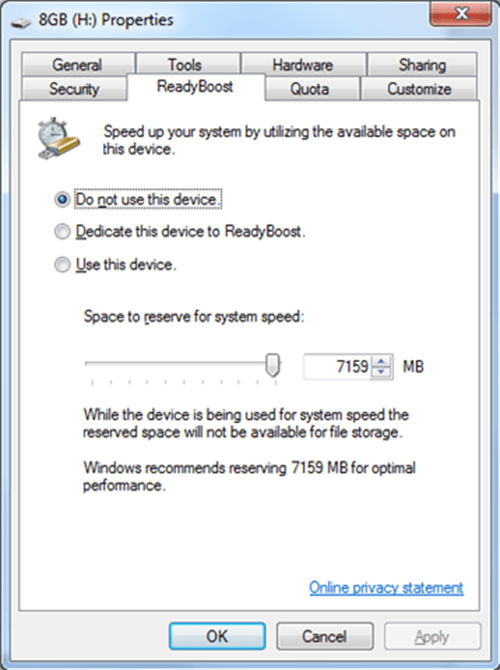
Safely remove the external device and plug it into the USB port to check again.
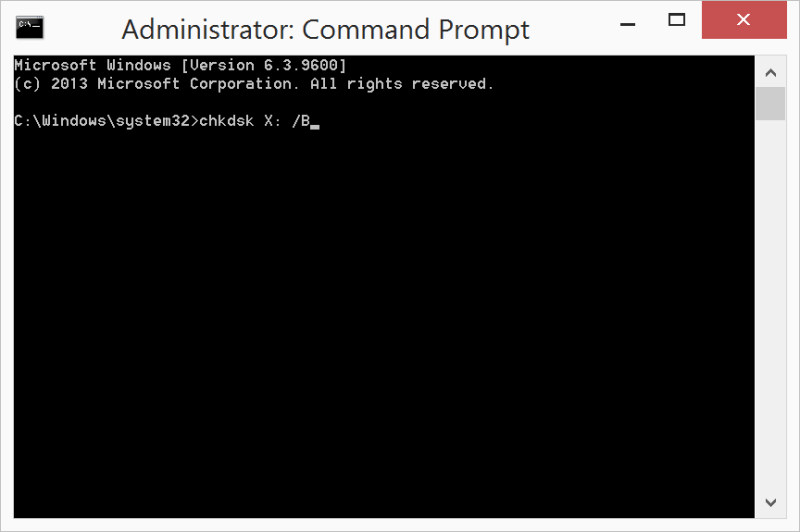
Solution 4: Fix the Volume is Dirty Issue using CMD
Another well-performed solution is using CMD to check the external device with these steps:
Step 1. Right-click on the Start button and choose Command Prompt (Admin), for Windows 10 user, you should select Windows Powershell (Admin).
Step 2. Paste the command below into the window:
chkdsk X: /B
Solution 5: Reinstall Driver Software
The other solution worth a try is to reinstall or update the driver software of the external hard drive, USB flash drive, etc. These steps are to make sure the driver software may not get out-to-dated and cause the operation could not be completed because the volume is dirty error.
Step 1. Connect your USB flash drive or external hard drive to the computer, after that, press Win Logo key + R and then type: devmgmt.msc to open Device Manager Window.
Step 2. Now, look for the External Device you plugged in and then Right-click on it.
Step 3. Select Uninstall to let the Windows system to delete the driver software and then right-click on the machine name and choose Scan for hardware changes to reinstall the driver software automatically.
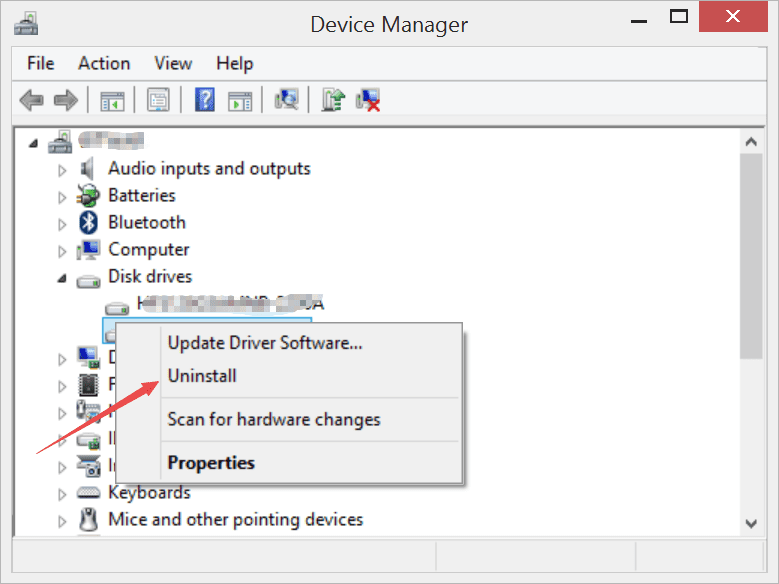
Else, you can also click on Update Driver Software and search the latest one automatically.
Solution 6: Format Drive
Well, the final option is very depressing, as you will lose all your files, but if anything is not working; you must format the drive. Make sure you copy the essential data before formatting.
Step 1. So, you have to open your PC and make a right-click on the Hard drive partition and click Format.
Step 2. Click on the Restore Device Defaults option and lastly click OK to execute.
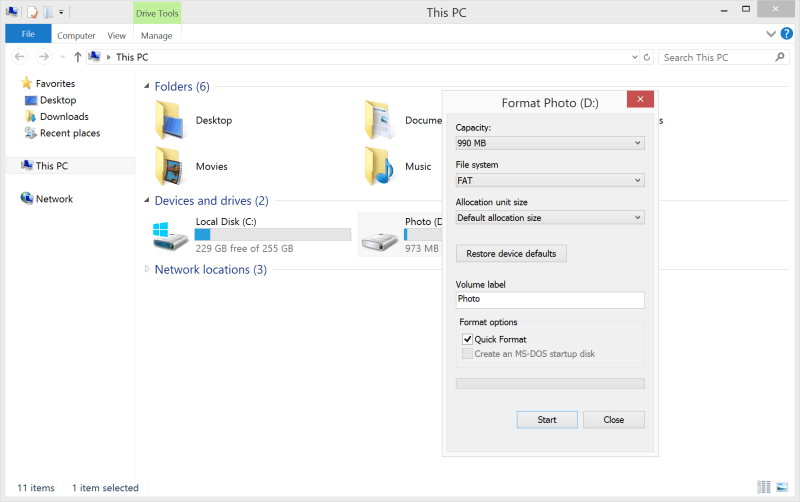
After the hard drive partition is formatted, you will not have to face the error message.
Extra Tip: Recover Data from a Formatted Hard Drive
Unfortunately, you can lose all of your data after formatting your hard drive. Formatting your hard drive will fix the issue, but it will also erase your files.
But if you are hung up on them and forgot to copy or backup your files; you can retrieve all those lost files with Bitwar Data Recovery. It is a great program. Effective and comes with an excellent data recovery rate. The operational procedure is pretty simple; we have detailed it below. Let’s have a look;
Step 1. Download and install the latest version of Bitwar Data Recovery Software on your computer.
Download for PC Download for Mac
Step 2. Now, launch the program and choose the Hard drive that you are about to format and click Next to proceed.

Step 3. Choose the Formatted Recovery in the scan mode and click Next to proceed.
(If this mode can’t work to find the lost data, try with Deep Scan mode next time).
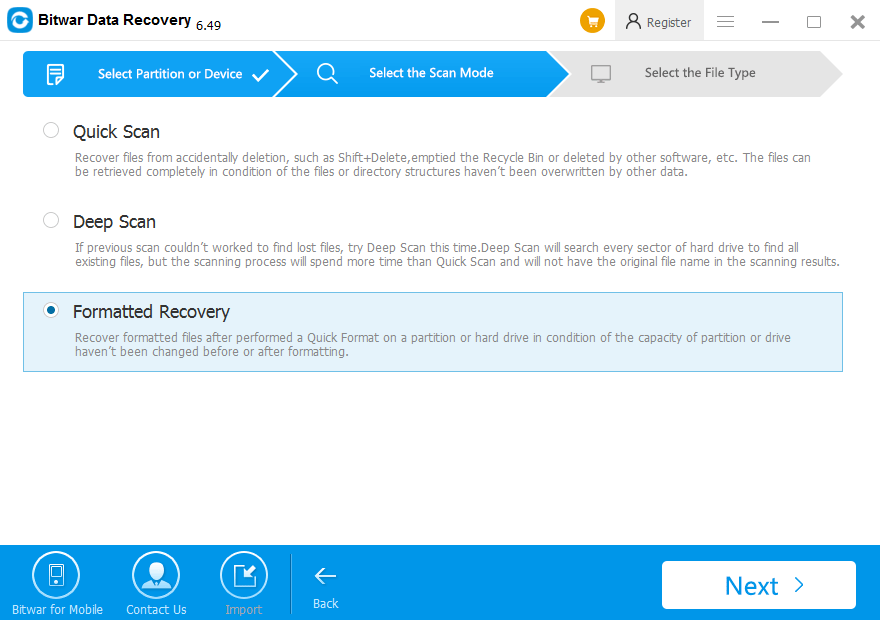
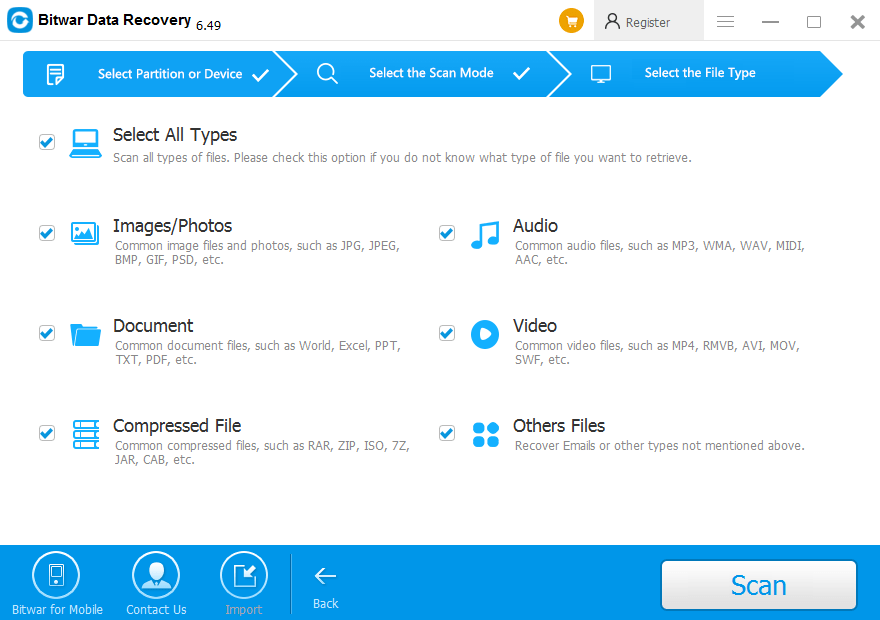
Step 4. Select the File types you need to recover and click Next to proceed.
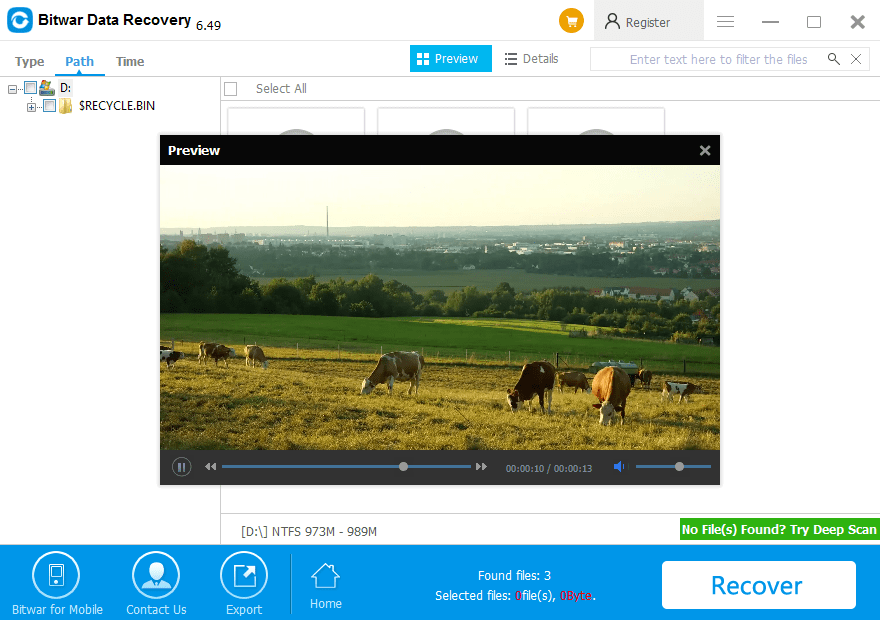
Step 5. After the scan is complete, Preview and then click Recover to retrieve the files.
Fix Issue Now!
Error code: 0x80071ac3, the operation could not be completed because the volume is dirty will not permit you to copy files as Windows is unable to read or write the data. Mostly occur when copying files to a USB or an external hard drive due to bad sectors or some other reasons.
Do not worry! We have detailed a few of the most effective methods to fix the said error if all of the solutions couldn’t resolve the error, backup all the vital data with Bitwar Data Recovery Software to restore or backup those files and format the external hard drive.


Using CMD (Solution 4) worked for me, very cool tutorial thanks for being so specific and put step by step in a friendly way, very grateful!
Hello, Clark, thank you for your kindly feedback, have a good day.
Comments are closed.